Web Management Interface Guide
This guide provides an overview of the CUBE’s Web Management Interface, and illustrates various features provided by the interface.
The Web Interface
- The interface is divided into 2 areas (Fig 1):
- The Main view (Bottom)
- The Navigation panel (Top)
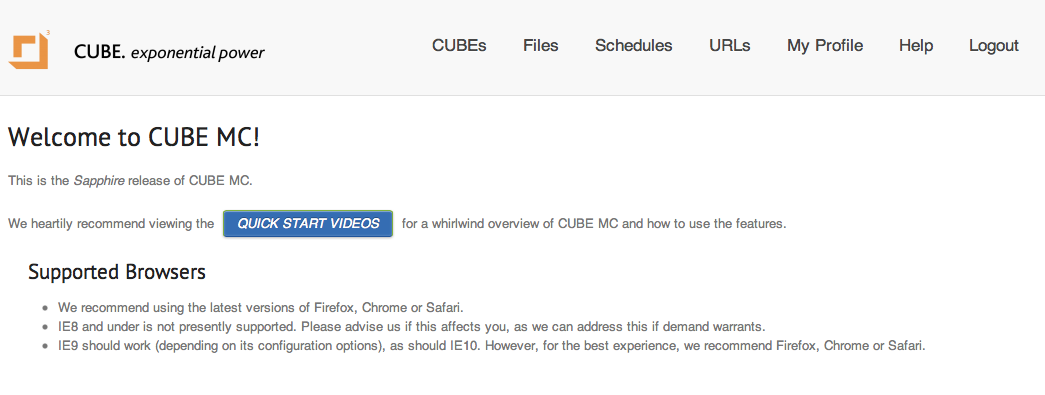
Home Screen
Upon login, the user will be taken to a home screen.
Here you will see important notifications. There is also a link to wide array of ‘Quick Start Videos’, these videos cover the usage of this interface in more detail.
Main Management Screen
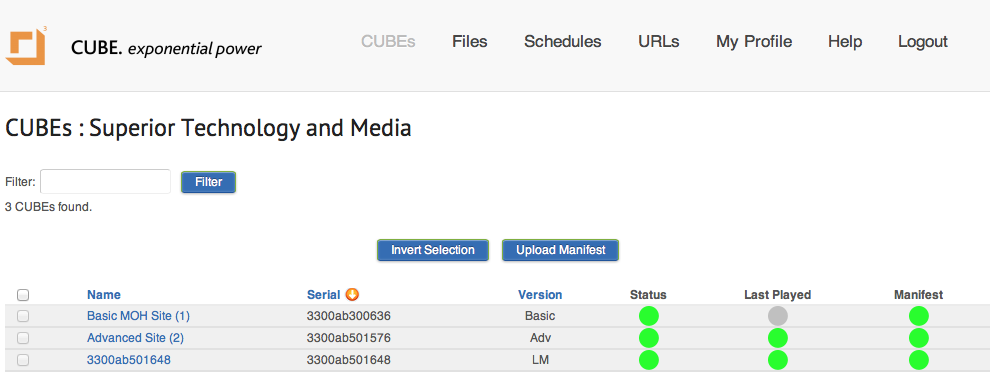
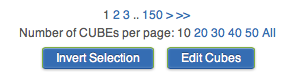
Since the user is associated with a particular provider, the main management screen (Fig. 2) will display a list of the particular CUBEs that are associated with that provider. The default number of cubes per page is set to 10 (Fig. 2a), but the user can change it for the active session. The user is able to administer all of these CUBEs.
Each line represents summary information of an individual CUBE. A user can choose to sort the CUBEs by ‘Name’, ‘Serial Number’ or ‘Version’ by clicking on the corresponding heading. By clicking multiple times on the heading, the sorting order can be toggled between ascending and descending order.
The information in each line is: Name, Serial Number, Version, Status, Last Played and Manifest.
- Name
- By default, each CUBE’s name will be the same as the serial number of the CUBE (e.g. ‘3300ab501648’ in Fig. 2). Clicking on the CUBE’s name will navigate the user to the CUBE’s main page (see Main View for an Individual CUBE), where the user may assign an arbitrary name to each CUBE.
- Version
- This describes what version of service the particular CUBE offers, ie what “kind” the particular CUBE is, e.g. Basic, ADV (Advanced), LM (Licensed Music), and so forth. This determines the features available on that CUBE, and what linking options are available to this CUBE see Linking Schedules / Playlists.
- Status
This indicates the ‘Last seen’ status – the last time the CUBE successfully communicated with the server to obtain the latest version of the Manifest. The status icon will be one of 25 different colours (see below, only 4 are illustrated). The colour changes gradually from green to red, one step for each hour. The colour may also be grey, if the CUBE has never been seen. The user can hover over the icon (by holding the mouse pointer over the icon for approximately 1 second), to see the date and time the CUBE was ‘Last seen.’ The time will be displayed according to the time zone as set in the User Profile.

|
Never seen |

|
Seen less than 1 hour ago |

|
Seen 12-13 hours ago |

|
Not seen for 25+ hours |
- Last Played
This indicates the ‘Last Played’ status. The icon will be one of:
|
|
The CUBE has never reported what is currently playing |
|
|
The CUBE has reported currently playing items within the last 30 minutes |

|
It has been 30-60 minutes since the CUBE last reported currently playing items |
|
|
It has been over 60 minutes since the CUBE last reported currently playing items |
Note
- The BASIC version does NOT report currently playing items, and this indicator can be expected to remain grey for BASIC versions.
- While Amber or Red may indicate a network issue, it will also occur if the CUBE’s schedule is programmed not to play material during specific times.
- The user can hover over the icon to see the date and time as well as the name of the last played item. More detail is available on the CUBE’s main page.
- Manifest
This indicates the ‘Manifest’ install status. The icon will be one of:
|
|
No Manifest sync information is yet available |
|
|
Manifest sync successful. This means the CUBE is up to date with the latest Manifest that was provisioned via the web interface. |
|
|
Manifest sync pending. This means that a user has provided a new Manifest via the web interface, which is still pending sync to the CUBE. |
|
|
Manifest sync failed. Specific error messages can be seen in the CUBE’s main page, and the CUBE will continue to re-attempt synchronization. (Also consult the Manifest Guide for more detail). |
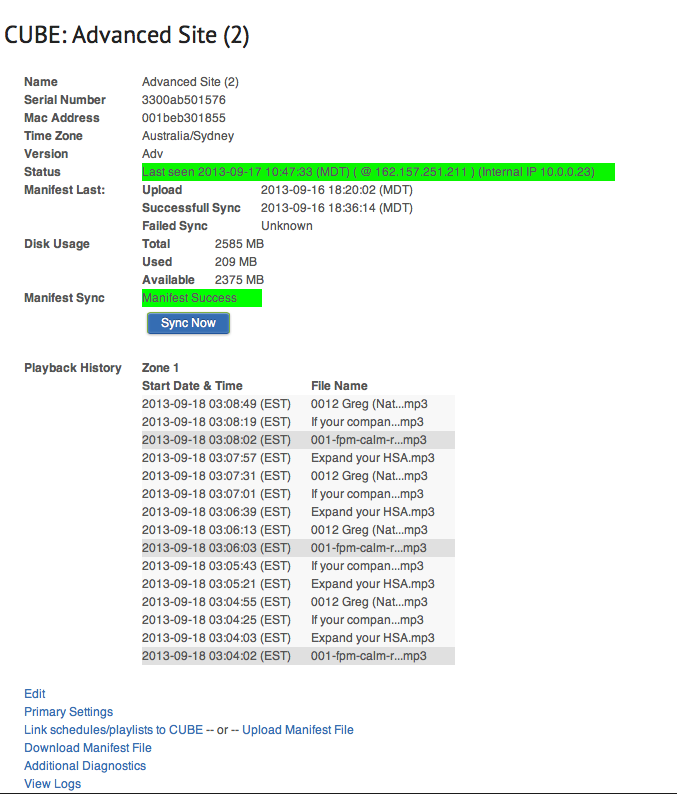
Main View for an Individual CUBE
This view represents the detail information of an individual CUBE (Fig.2), and is reached by clicking on the CUBE’s name in the Home screen.
The following information is available in this view:
- Name
- The name given to the CUBE (defaults to the serial number). This can be changed using the Edit CUBE action.
- Serial Number
- This is the factory set serial number.
- Mac Address
- This is the factory set MAC address of the CUBE’s ethernet port.
- Time Zone
- This is the time zone the CUBE operates in, and which applies to any schedules run by the CUBE. This time zone can be changed using the Edit CUBE action.
- Version
- This has the same meaning as on the Home Screen.
- Status
- This has the same meaning as on the Home Screen. It also includes the IP Address from which the CUBE was last seen, as well as the time (shown in the time zone of the current user).
- Manifest Last
This shows a the last time a variety of Manifest-related events occurred.
Times are displayed in the current user’s time zone, as set in the User Profile.
- Upload: This shows the last time that a user provisioned (uploaded) a new Manifest for the CUBE via the web interface.
- Successful Sync: Last time the Manifest was successfully synced to the CUBE
- Failed Sync: Last time that the Manifest had failed to sync
- Manifest Sync
This shows the status of the CUBE’s most recent attempt to synchronize the Manifest. It will be one of:
- Success – the CUBE is up to date with the latest Manifest
- Pending – a user has uploaded a more recent Manifest for the CUBE, and sync is still pending
- Sync Started – the CUBE has started the sync process. There well also be a progress bar indicating the sync progress
- Fail – there was a error during synchronization. The List of Errors is presented elsewhere on the screen, see Manifest Error Report; the CUBE will continue retrying the sync.
- Playback History
- This is the playback history for each available channel. Information includes the date and time the audio started, the file name and type (darker grey for music, lighter grey for message). Times are shown in the time zone of the CUBE.
CUBE Actions
The main view for each individual CUBE also allows the following actions to be performed by the user:
- Edit
- Edit the name and time zone of the CUBE.
- Primary Settings
- Adjust the primary settings for a particular CUBE see Primary Settings.
- Link schedules/playlists to CUBE – or – Upload Manifest File
Link schedules and/or playlists to a particular CUBE see Schedule Editor.
Or
Provision a new Manifest file for the particular CUBE. it is also possible to upload one Manifest to several CUBEs in one go, see Uploading a single Manifest to Multiple CUBEs.
- Download Manifest File
- Use this to download the current Manifest file available to the CUBE from the server. (Note that this does not necessarily correspond to the present Manifest on board the CUBE, but is the Manifest that was most recently provisioned/uploaded for the CUBE via the web application).
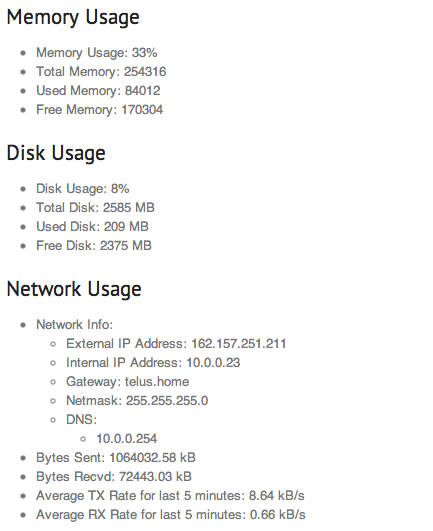
- Additional Diagnostics
- View more detailed diagnostics for a particular CUBE see Additional Diagnostics.
- View Logs
- View up to 30 days worth of playback history (no playback information is available on a ‘Basic’ version)
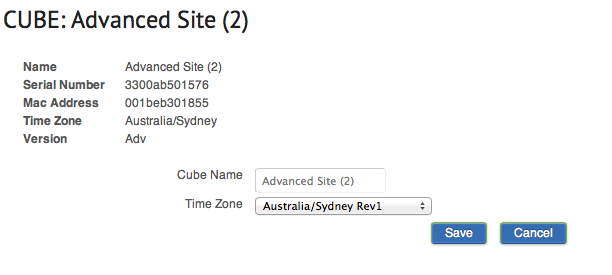
Edit CUBE
Here the user can set the name and time zone of the CUBE (fig 4).
Setting the time zone will cause the CUBE to update its time to that of the given time zone. All scheduling instructions provided to the CUBE via the Manifest are executed by the CUBE in terms of this time zone.
Schedule Editor
Here you can create and edit your schedules. This page is divided into three (3) areas: the navigation bar (top), list of schedules (left) and the main schedule editor area (right).
There are three (3) different types of schedules: ‘Music’ (red), ‘Msg’ (green), and ‘Item’ (blue).
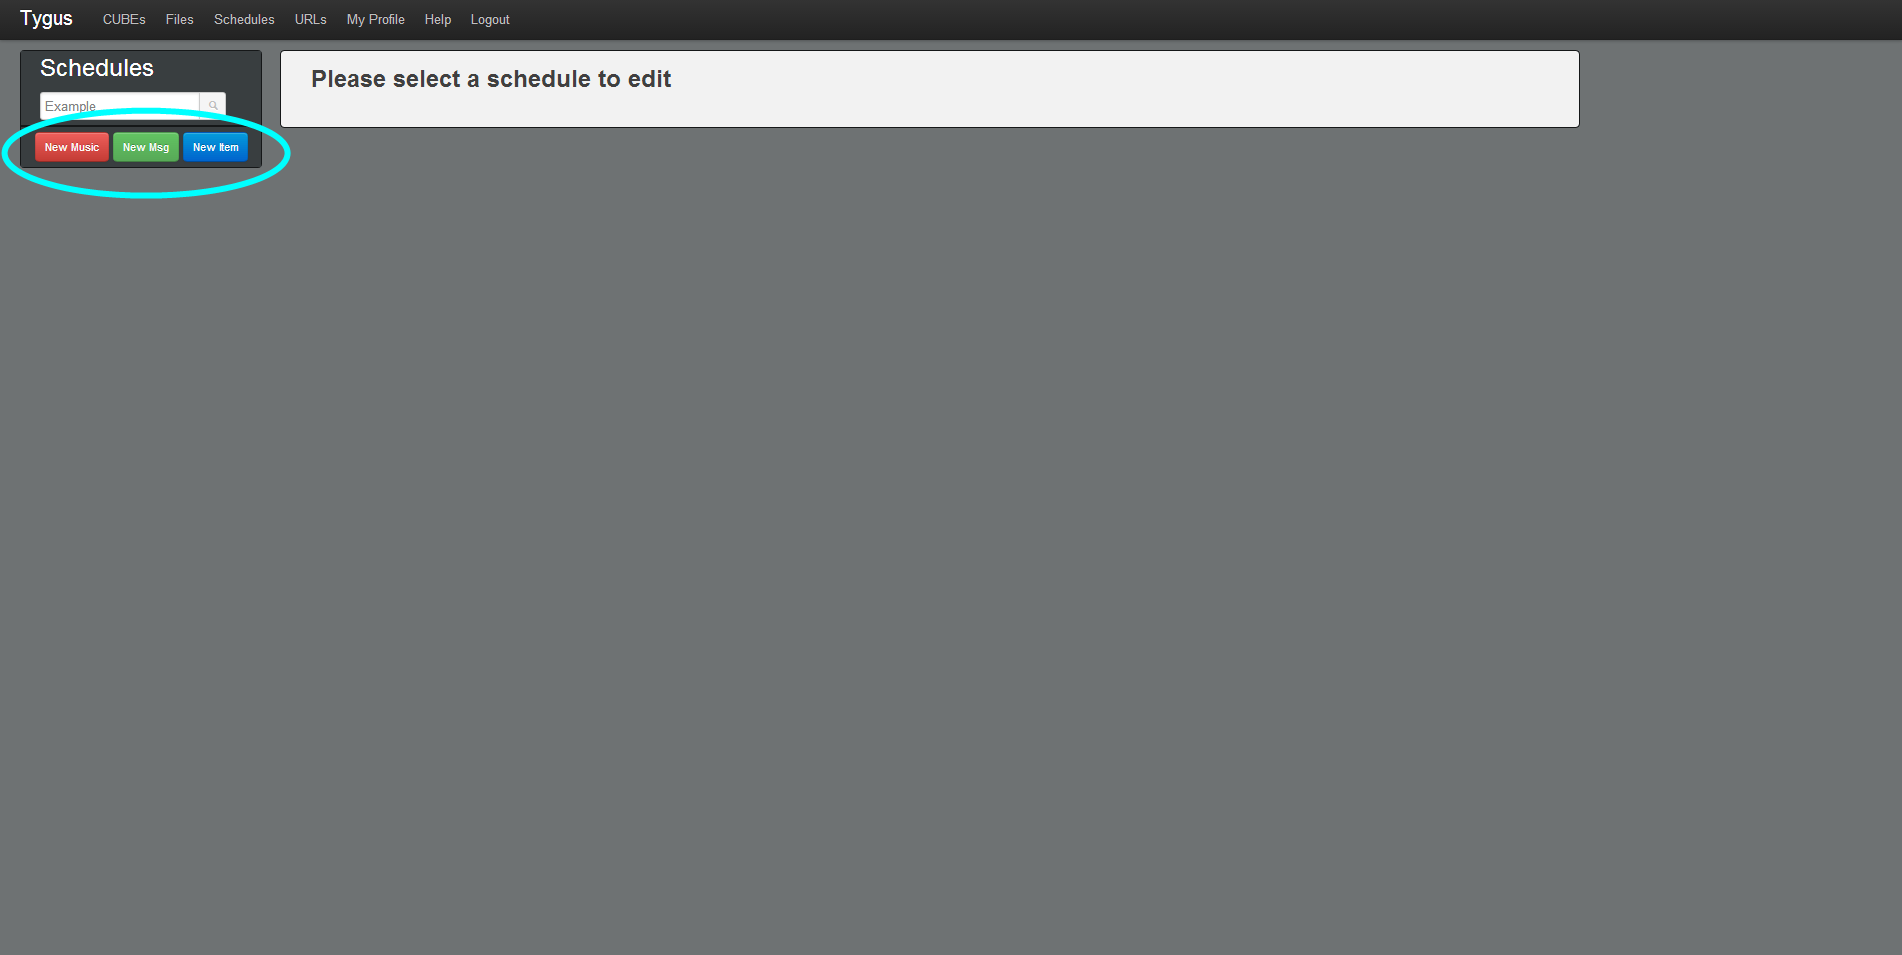
Schedule List area
Here you can ‘filter’ the schedules by name using the ‘Search’ field, select an existing schedule to be edited by clicking on a schedule name, and/or create a new schedule by clicking on the ‘new’ buttons on the bottom. Schedules can also be deleted by clicking on the red ‘cancel’ button beside the schedule name. This button is only available if the schedule is not linked to any CUBEs.
Schedule Types
Note
Roughly vs Exactly: ‘Exactly’ scheduling an item is useful when something needs to be performed on time. When something is exactly scheduled, it will interrupt the currently playing music track and perform the action, continuing with the next song in the music playlist after the action is completed. Whereas, when ‘roughly’ scheduling a track, it will wait until the current music track has finished playing before performing the action. Roughly scheduling an item leads to a more consistent playback when timing isn’t critical.
- ‘Music’ (red): Use this to schedule music playlists. Music playlists have only a start time, so any scheduled music playlist will play until it has to switch to another playlist. For your convenience, there is a predefined ‘Silence’ playlist. There will always be only one music playlist playing at any given time. Switching from one playlist to the next can be done either ‘roughly’ (the new playlist will take effect after the currently playing track finished) or ‘exactly’ (the currently playing track will be stopped immediately and the new playlist will come into effect). Settings include shuffle on/off and crossfading information (the default crossfading settings should work for 95% of cases).
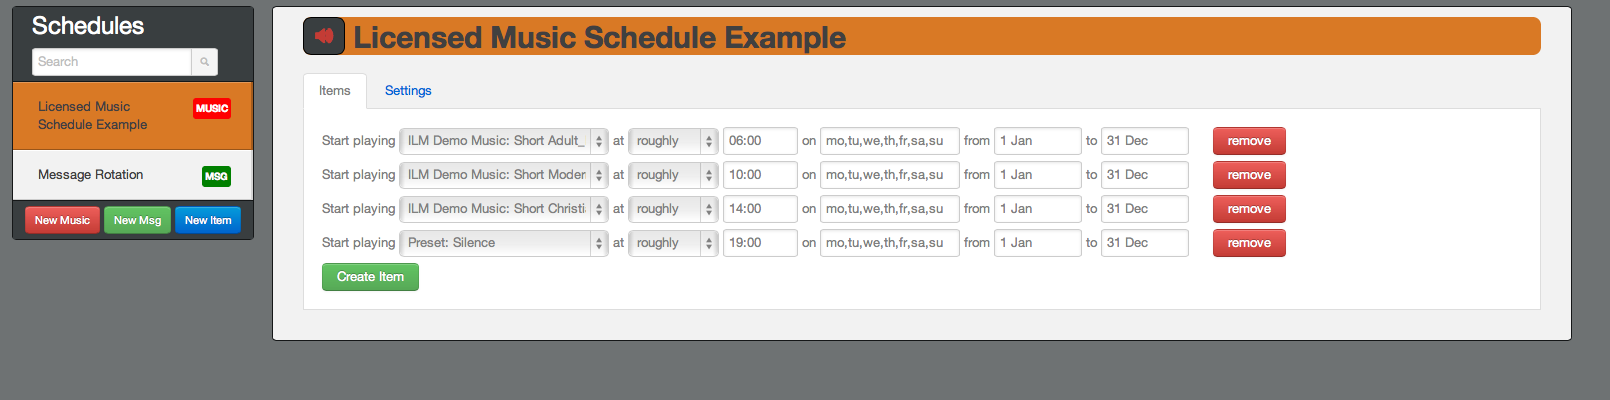
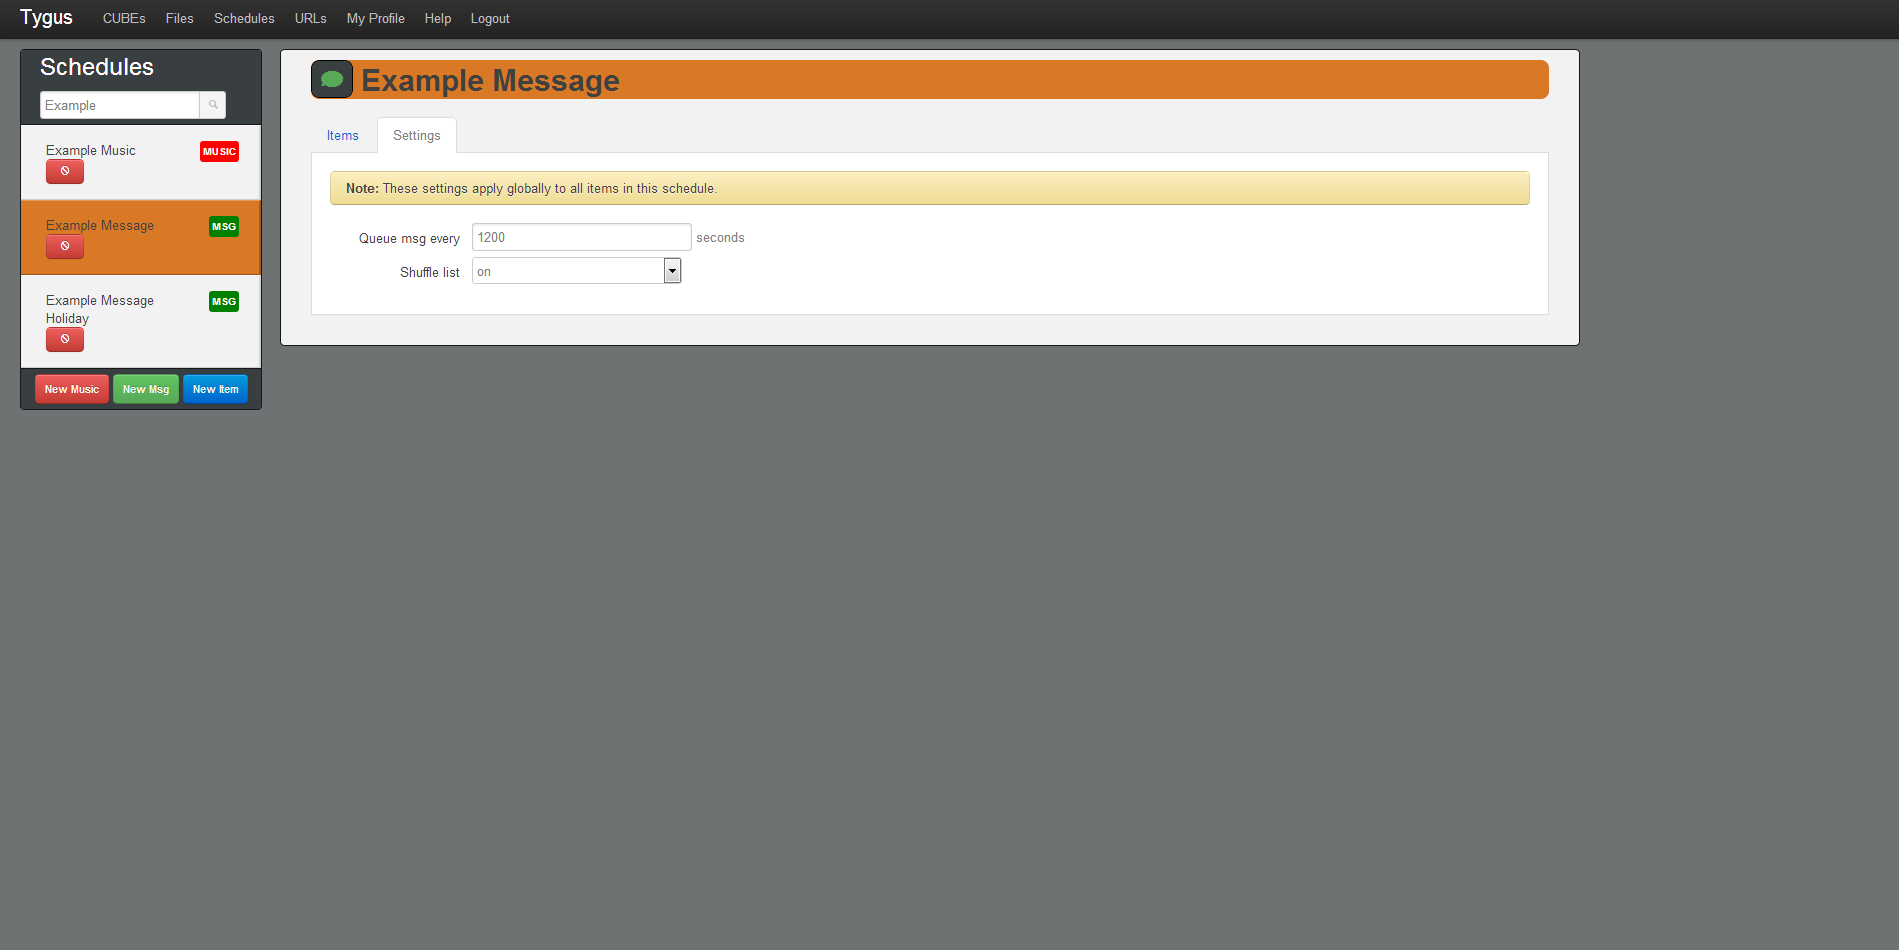
- ‘Msg’ (green): Use this to schedule message playlists. Message playlists must have a start time and an end time. More than one message playlist can be active at any given time. In this instance, both message playlists inject messages into the playback queue at the interval specified in the settings. When more than one message playlist requests a message to be played at the same time, the messages will play one-after-the-other in NO specific order. Settings include shuffle on/off and time between messages. The message playlist start time and the message interval are used to calculate when messages should be played. For example, if a message playlist is scheduled to start at 06:00 and have a 600 second (10 minute) wait time, then messages will play at or as close to: 06:00 - 06:10 - 06:20 etc. If the CUBE was turned on at 06:05, the next message will play at 06:10. If shuffling is turned off, the message playlist will play out in the same order resulting in the same message playing at the same time of day, each day the schedule is active.
- ‘Item’ (blue): Use this to schedule individual messages from any given playlist at a given time. This is useful for announcements that have to be played at a specific time i.e. ‘The store will close in 10 minutes’. These messages can be scheduled to play at ‘roughly’ or ‘exactly’ the indicated time. Exactly scheduled messages will interrupt any music track (after which the next track will play) and takes precedence over regular messages. No settings are available.
Example Schedule
Now we’re going to set up a schedule for Example Retailer. Our hypothetical customer has a small shop that is open from 9 to 5:30 on weekdays and closed on weekends. During the week, they want pop music playing during store hours to attract young people to the store. On the weekends they want classical music playing from mid morning until early evening to discourage loitering. Outside of these times, they would like no audio to play.
On the days they are open, they would like to announce a promotional special every 20 minutes. During December, they would like an additional set of holiday specific messages played once an hour to spread holiday cheer. In addition, they would like store closing announcement played 15 minutes before close and exactly at closing time each week day.
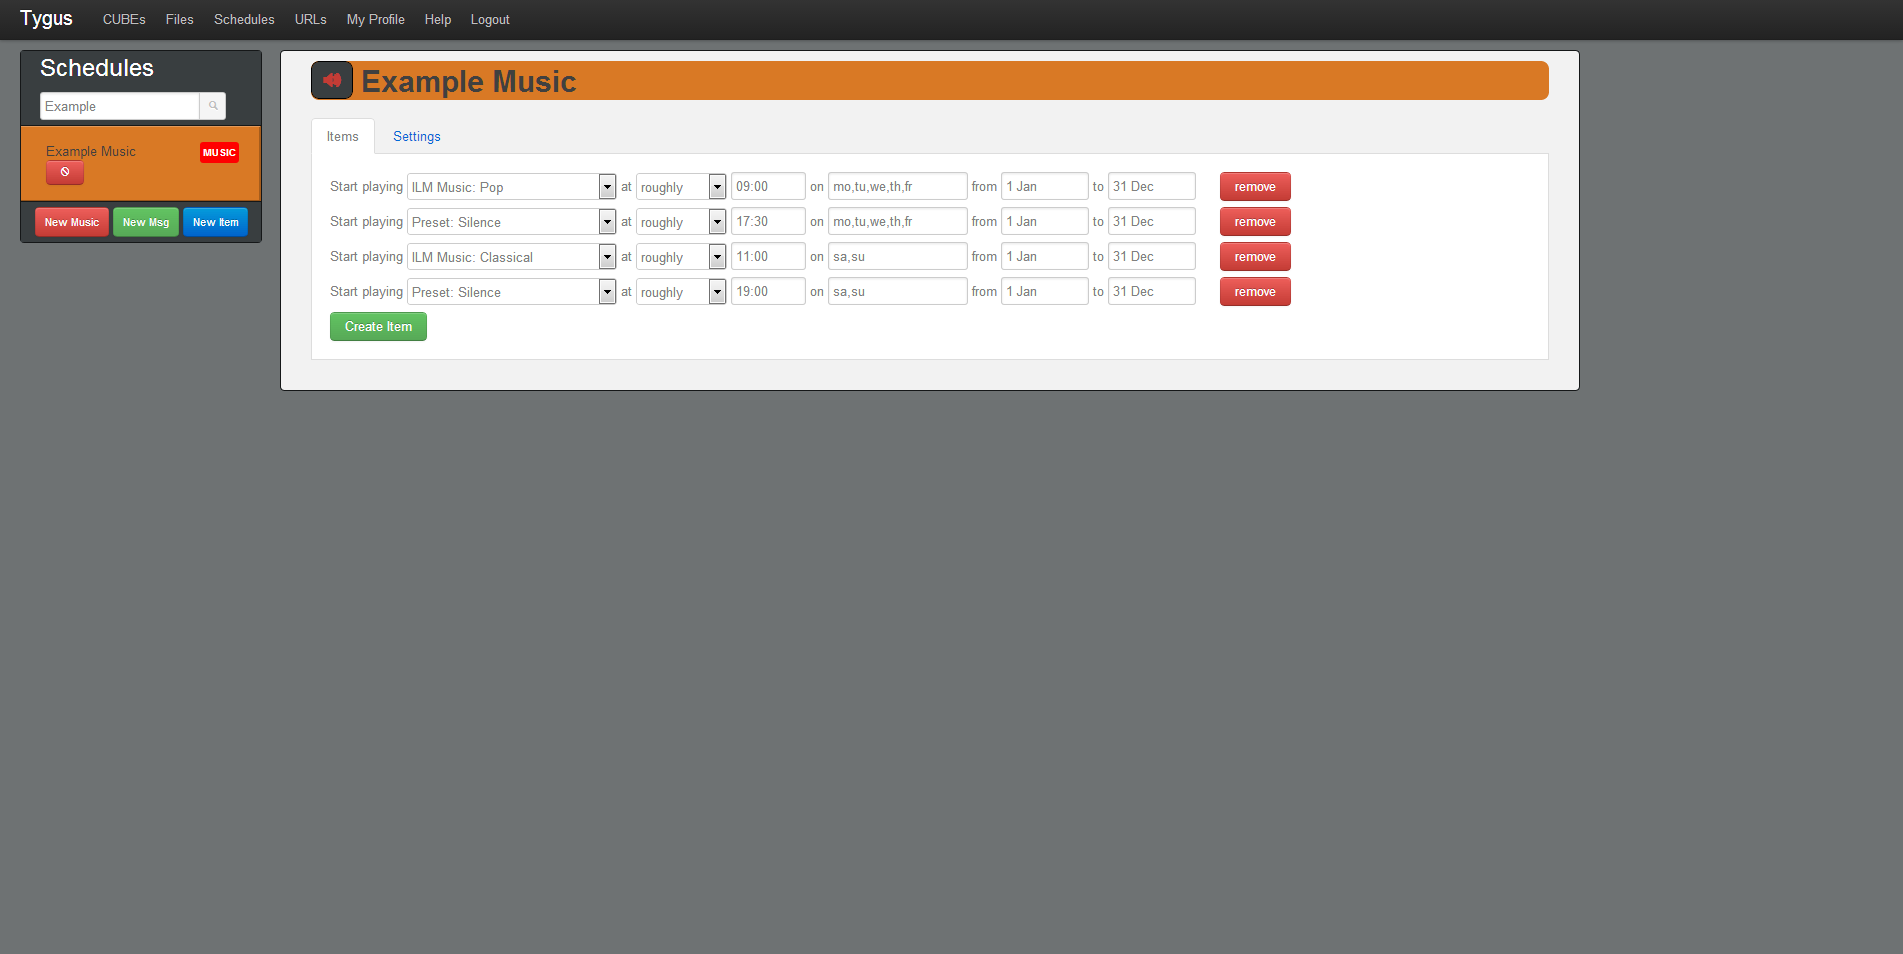
First lets set up the music. For this we’ll create a new “Music” schedule and add 4 entries.
Since with music there always needs to be some sort of playlist active, we need to specifically schedule the silence playlist when we want the unit to be silent. Using the day of week selector, we can tell the CUBE which days to play which music. We leave the schedule with the default music settings which are to randomize the playlist after playing through and some decent crossfading settings.
The net effect of this schedule is to have pop music play on Monday to Friday from 9:00 to 17:30 and on Saturday and Sunday have classical music play from 11:00 to 19:00. Nothing will play outside of those days and times.
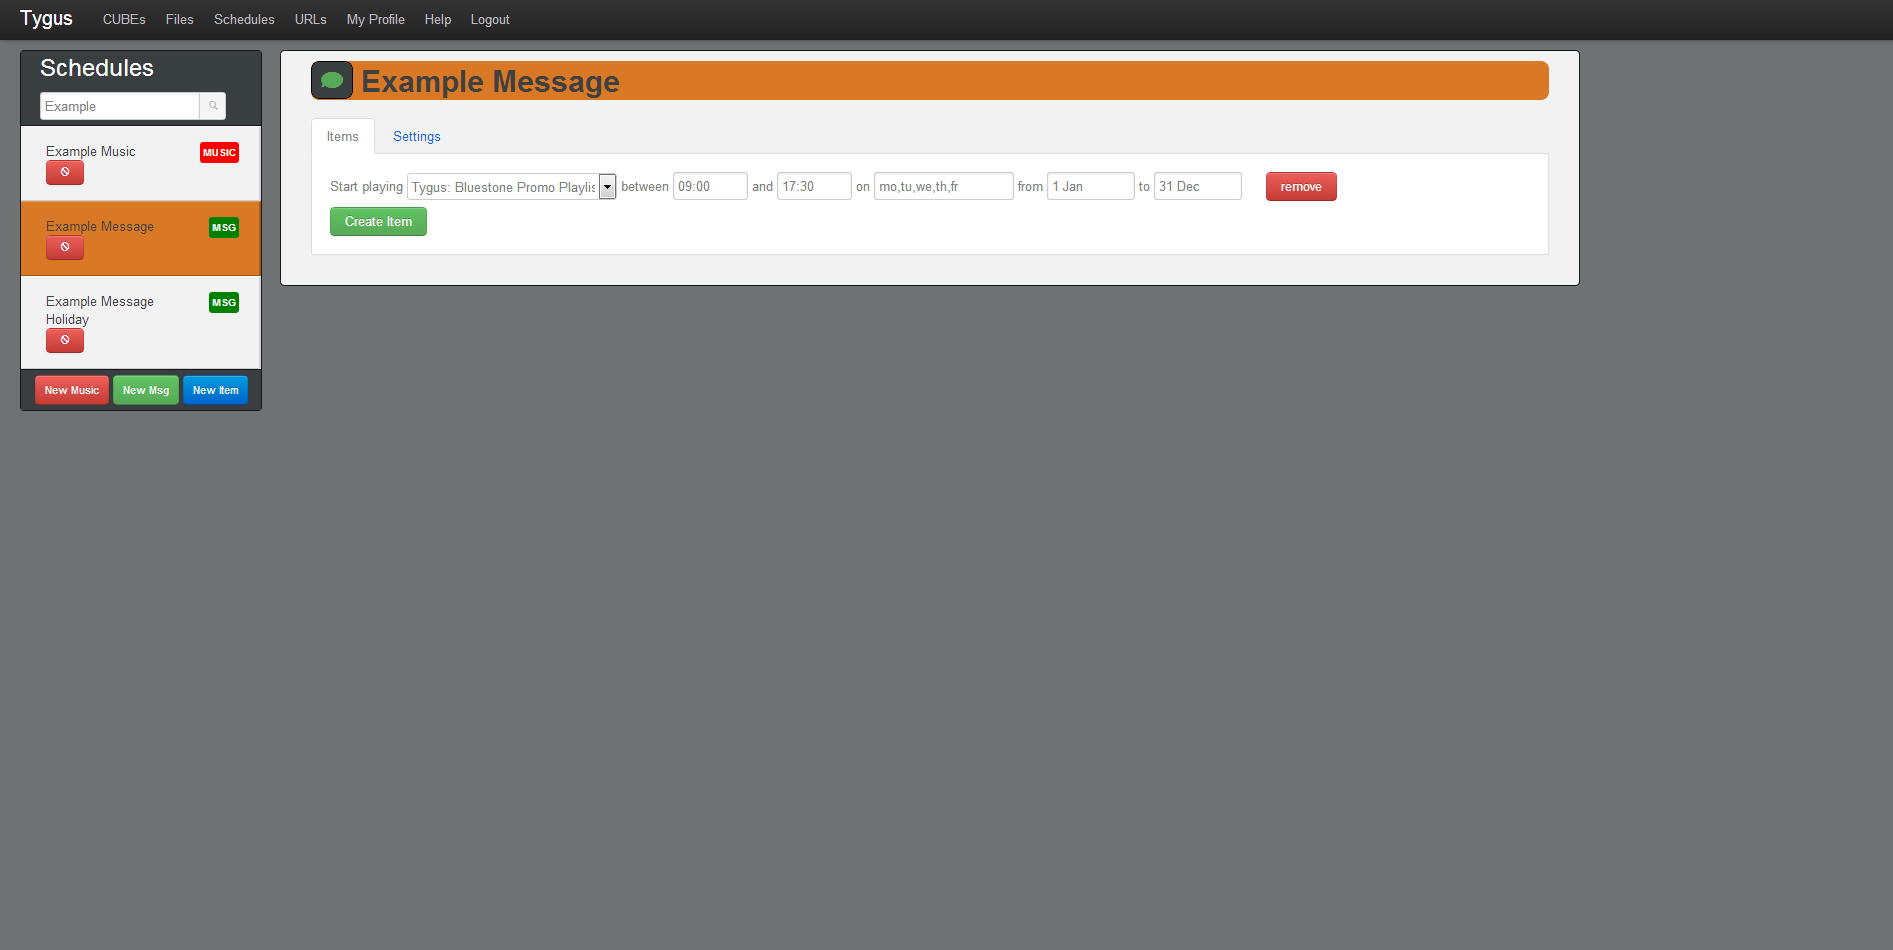
Next, we’ll set up the promotional messages. To do this, we’ll need to create two new “Msg” schedules and add a couple entries to each.
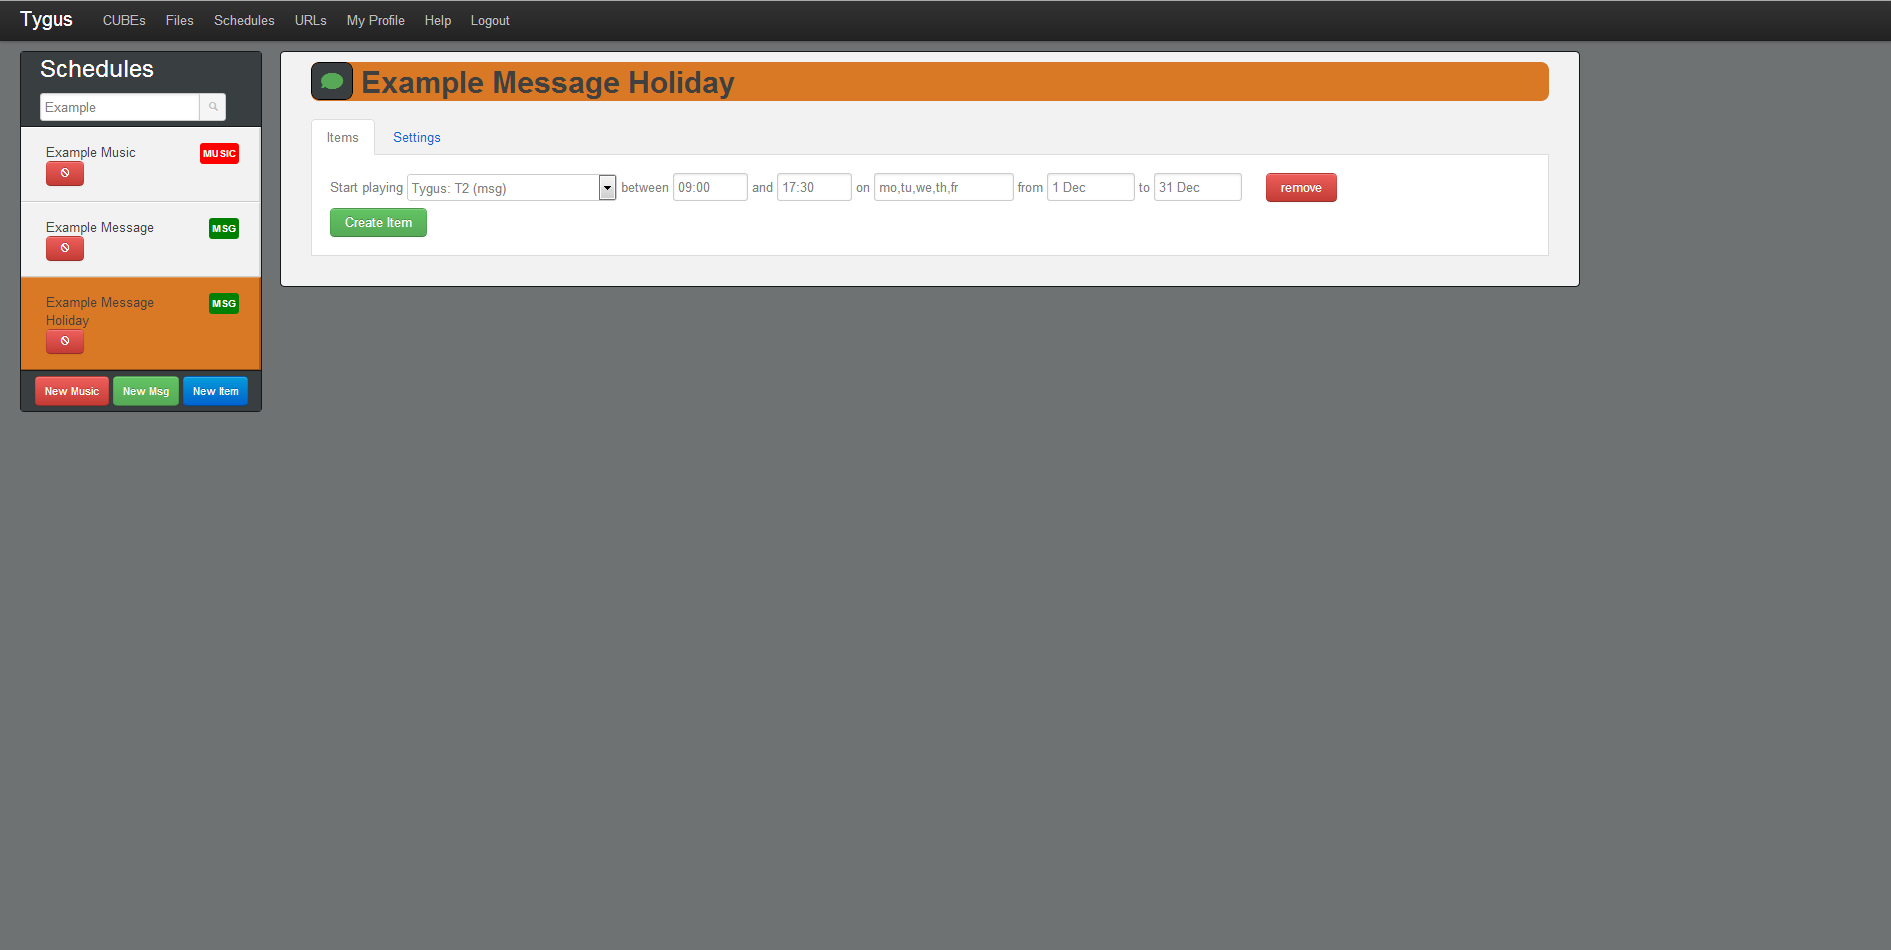
During December we’ll have two active message playlists - our original promotional playlist and our holiday playlist (our holiday playlist is, oddly, called “T2”). We’ll have our standard promotional message loop that we’ve configured to run every 20 minutes and we’ll also have our holiday messages that are played once an hour. We can change the time between messages in the schedules settings tab.
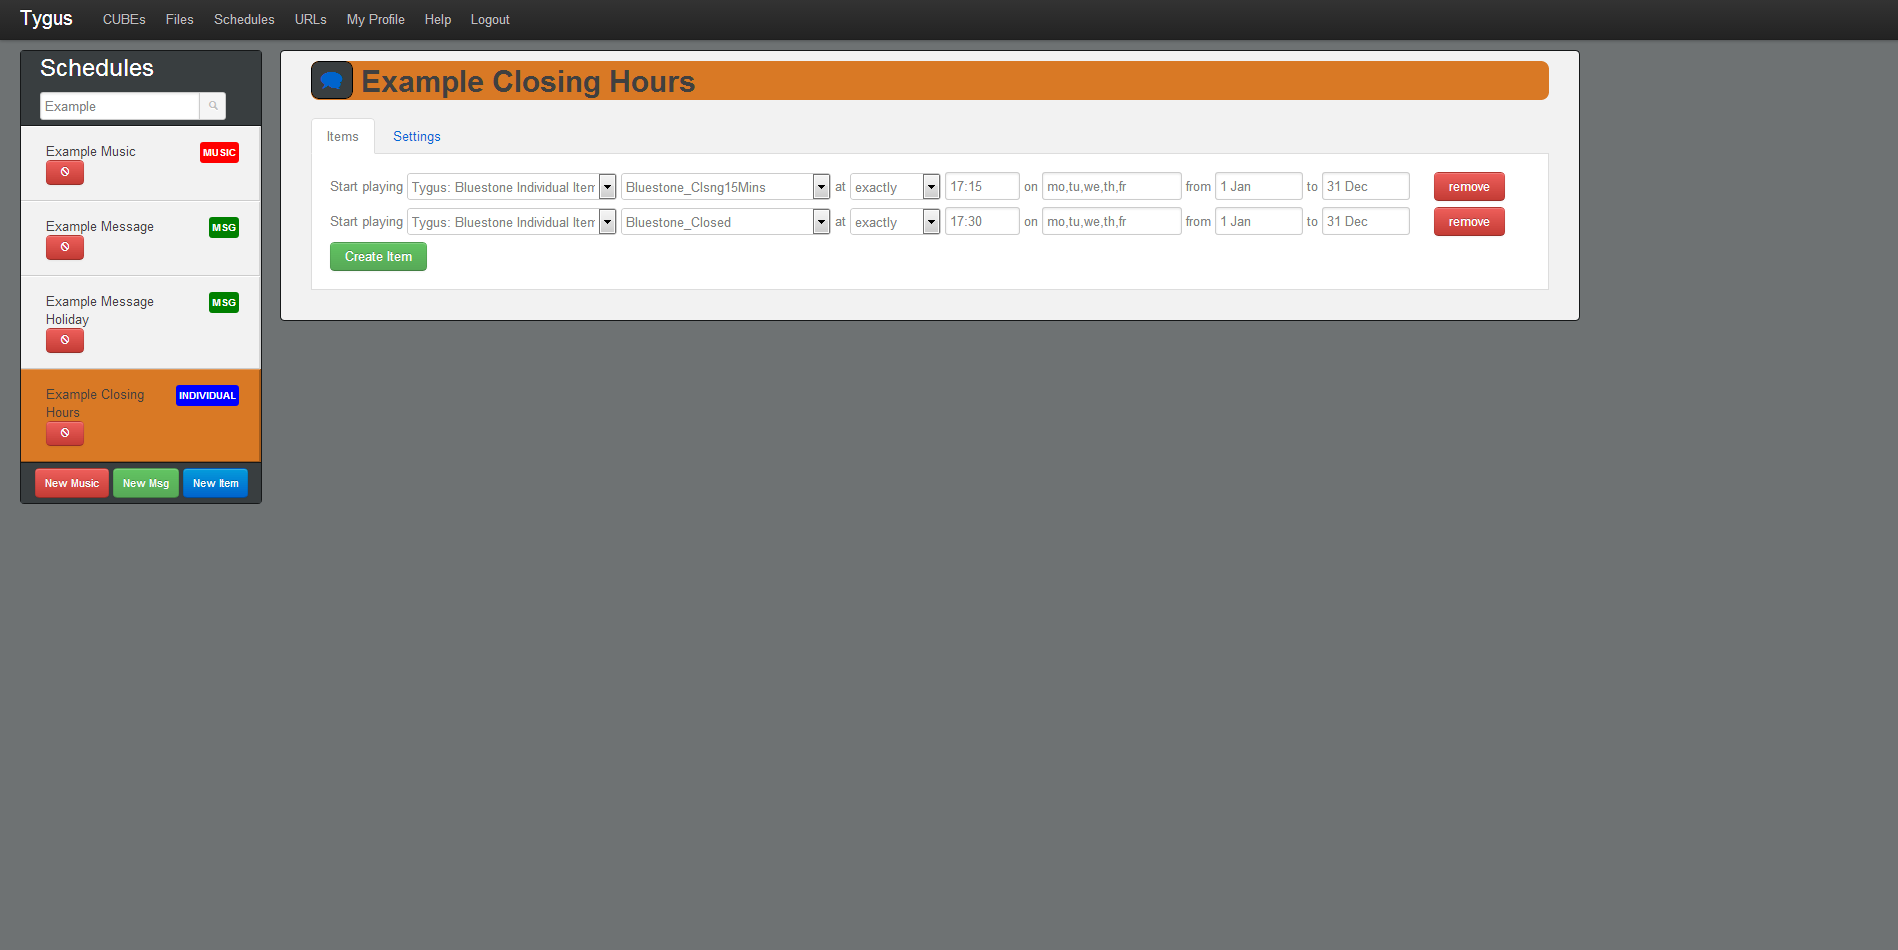
Finally, we need to handle making the store closing announcements. For this we’ll create a single “Item” schedule.
In this, we simply choose the specific message file we’d like to play and specify the day and time we would like this message announced. Since it is rather important that we close on time, we select the track to play “exactly” at that time. The end result is that any currently playing music track is stopped immediately and the announcement is made. Afterwards, the next music track in the playlist is played.
Great! We’ve finished setting up our schedules to the client’s specifications. Read the next section to find out how to link these schedules to their CUBE.
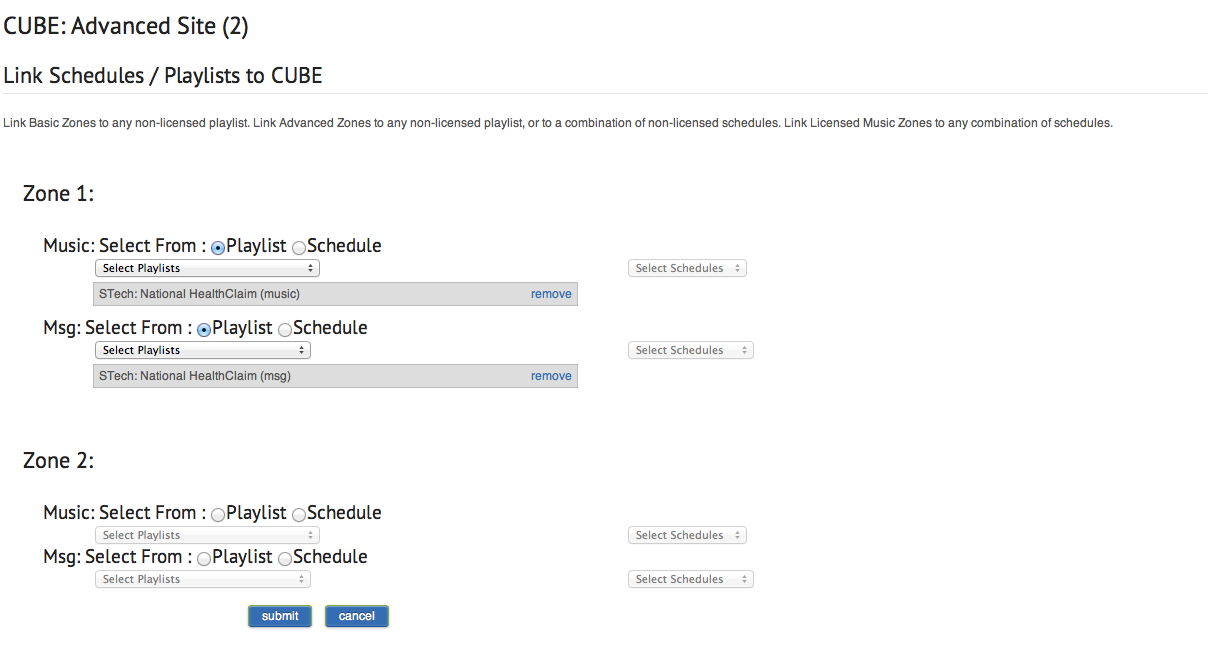
Linking Schedules / Playlists:
On this page is where you link individual playlists and/or schedules to the different zones and strips (music or message). Depending on the version of the particular CUBE there will be different options. Fig. 11 shows a CUBE running the ADV application.
You can link any number of playlist or schedules. You can drag-n-drop playlists to reorder them.
- Basic
- Only one zone.
You can only pick from playlists.
- Adv
- 2 zones.
You can pick from playlists and/or schedules (but only from one per zone/strip).
You can NOT pick from music schedules that contains ANY commercial music.
- LM
- 2 zones.
You can only pick from schedules.
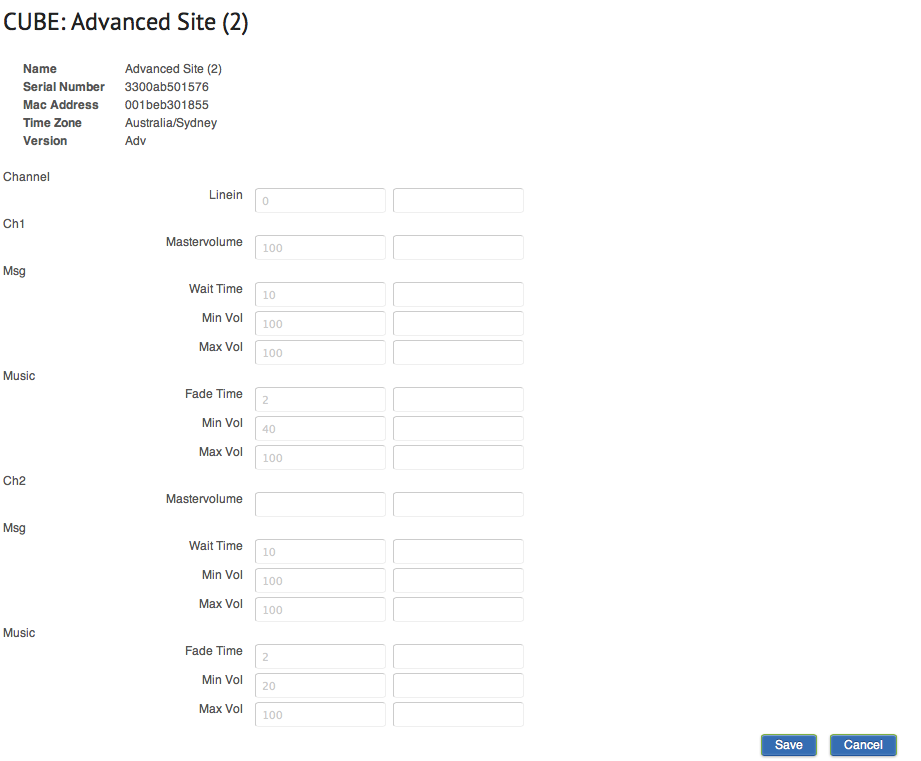
Primary Settings
This is where you can set a particular CUBEs settings. There are two (2) columns, the first shows the reported settings (what the CUBE is set to) and the second shows the new/pending values (yet to be set on the CUBE). The settings include amplifier on/off, two sets of the following (1 for zone 1 and 1 for zone 2) Mastervolume, Msg (Wait Time, Min Vol, Max Vol), Music (Fade Time, Min Vol, Max Vol).
- Msg - Wait Time
- This is the time in seconds the CUBE should use to space messages appart. This is only used for the Basic version and ADV (if you linked it to a playlist), schedules has there own settings.
- Msg - Max Vol
- This is the volume the CUBE should play messages at.
- Music - Fade Time
- This is the time in seconds the CUBE should take to fade the music from it’s Max Vol to it’s Min Vol and back when a message is goning to be played. This is not used for LM.
- Music - Min Vol
- The volume music is played at while a message is being played.
- Music - Max Vol
- The regular volume music should be played at.
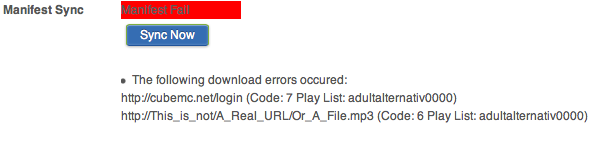
Manifest Error Report
There are various different reasons for a manifest sync to be labeled as failed. The CUBE main view provides a detailed list of each individual issue that was experienced during sync.
Even though a sync may be reflected as a failed sync, any item NOT listed in the failed report was synced successfully, and can be expected to play.
Fig. 14 illustrates an example of a failure report.
The errors are divided into 4 groups: Download Errors, File Errors, Scheduling Errors and Settings Errors.
- Download Errors
These errors are raised when the CUBE was unable to retrieve a specified url.
- Error Format: URL (Code:Y Play List:Z) where
- URL: This is the url that was specified
- Y: Error code (see Common Error Codes)
- Z: Play List name as specified by the tab name
- Example:
- http://This_is_not/A_Real_URL/Or_A_File.mp3 (Code: 404 Play List: ch1-music)
- Common Error Codes:
- 3 - URL not properly formatted
- 5 - Couldn’t resolve proxy
- 6 - Couldn’t resolve host
- 7 - Couldn’t connect to host/proxy
- 9 - Remote access denied
- 404 - URL does not exist on server
For 3xx, 4xx and 5xx errors please refer to http errors listings.
- File Errors
These errors are raised if a file seems unplayable.
Error Format: ‘file name/url’ (Play List:’tab name’)
- Scheduling Errors
- These errors are raised when the scheduling information is invalid (see Manifest Guide).
- Settings Errors
- These errors are raised when the Manifest contains invalid settings (see Manifest Guide).
Transient vs Permanent Errors
If any of the aforementioned errors occur, the Manifest sync will be labeled as Failed. The CUBE will make a best effort to proceed with what it has available on board, and it will continue trying to synchronize the Manifest at timed intervals.
Some kinds of errors may be transient. For example, if the download of an audio file timed out, or if a DNS lookup failed, then those errors may automatically clear up when the CUBE later makes its subsequent attempts to re-sync the Manifest.
If all errors are transient in nature, then with each subsequent re-sync attempt, the CUBE will obtain more of the outstanding content, until it eventually has fully synced with the Manifest (upon which it will report sync success).
However, some kinds of errors may be permanent. For example, if there are invalid settings in the Manifest, files that are not valid playable audio files, or URLs that are 404 (ie could not be found), these errors may not clear themselves up without human intervention.
Therefore in the event of a sync failed report, the Manifest Error Report should be reviewed to determine whether any human intervention is required.
Uploading a single Manifest to Multiple CUBEs
If a new Manifest should be applied to multiple CUBEs, this can be achieved by using the Upload Manifest to Multiple Cubes link from the Navigation Panel to the right.
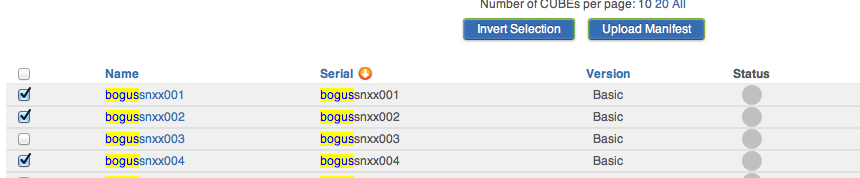
Select the appropriate Manifest file, and check all the relevant CUBES to which the Manifest should be applied (Fig.15). Then click the Upload button.
Note
The result is the same as if the Upload Manifest File function is used individually for each CUBE.
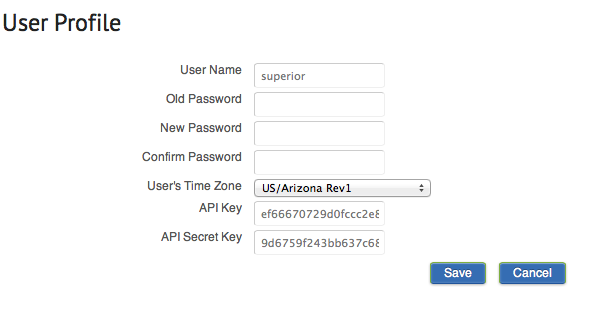
User Profile
The logged-in user can change his/her password and/or own local time zone by following the My User Profile link (in the Navigation Panel at the top).
If the user only wishes to change the time zone, there is no need to fill out any password information.
A Note on Time Zones
- As noted elsewhere in this guide:
- a time zone can be specified for each individual CUBE
- each logged-in user can specify their personal local time zones in their personal profile.
The time zone specified for each CUBE sets the time zone that is local to the CUBE. For instance, if a Manifest instructs a CUBE to commence a certain schedule at 6pm, this means 6pm according to the CUBE’s local time zone.
The time zone set by a user in their personal profile, is used only by the web application, to be able to display the times of certain events to each user in their own local times.
For example, a provider might have users in different time zones, such as in London and Paris. If for instance the “last seen” time of a CUBE was 13:00 GMT, then to the user in London this time can then be shown as “14:00 BST” while to the user in Paris, this same time can be shown as “15:00 CEST.”